
|
www.riscos.com Technical Support: |
The Make application aids the programmer in the construction and maintenance of multiple-file programs, which can be combined to form any number of final targets (for example, libraries, modules, and application programs). The set of final targets and the files from which they are constructed are known as a project (see later for a more detailed description of this term). The facilities provided for a project include
Make can be invoked in two ways; by double-clicking on the Make icon from a directory display, or by double-clicking on a file of type Makefile (0xFE1). In the latter case this will also run the Acorn Make Utility (AMU) tool to make the first target found in the chosen Makefile.
Clicking Menu on the Make icon gives the menu shown on the left.
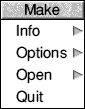
| Info | shows the normal information box about the application. |
| Options | allows the setting of auto-run and display options. |
| Open | is used to open a dialogue box for a given project. |
| Quit | quits Make. |
These are described more fully in later sections.
To use Make efficiently it is necessary first to understand how to create and maintain a project.
A project is made up of a collection of source and object files, which combine to form a number of final targets. The life cycle of a project will typically involve the creation and maintenance of the project, the production of final results, and finally, if required, the removal of the project from Make's control. The details of these steps are more fully described in later sections, but here we give an overview of their operation.
When a new project is created, you give it a unique name, and save its associated Makefile to disc. The persistent state of a project is held in a Makefile, which is automatically maintained by Make, with the option that it can be textually edited for customisation to a particular projects requirements. To achieve this automatic maintenance, the Makefile is divided into sections which are delimited by active comments (i.e. lines beginning with a (#), which are otherwise ignored by the AMU program).
The files which make up the project can reside anywhere on disc (or on a network) and can be added to, and removed from, the project by dragging their filer icons onto a dialogue box representing that project.
Final targets for the project are created by clicking on Make in the dialogue box relating to that project; the targets will be saved in the same directory as the Makefile for the project.
Under the desktop the concept of current directory has no sensible meaning, Make therefore uses the work directory in which the Makefile for a project has been saved as a prefix for all filenames used in the project. This prefix is denoted by the at symbol (@).
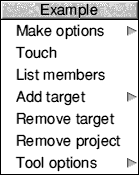
Clicking Menu on a project dialogue box gives the menu shown below, which is used to further tailor the project. References to this menu are made in a later section on maintaining projects.
In order to create a new project, you should click Select on the Make icon on the icon bar. This will display the New Project dialogue box as shown below, which allows you to enter information for the new project:
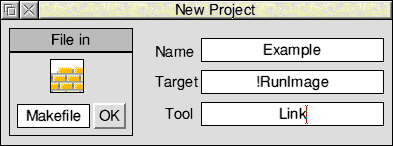
There are three writable icons in the New Project dialogue box which you must fill in before a new project can be created. These are:
| Name | you should fill this in with the name of the project. This name will be used to identify the project in the Open menu as described later. |
| Target | you should fill this in with the name of the main target to be created from this project. For example, if you were creating an application the target name would be !RunImage, if you were creating a module the target name would be the module's name (e.g. FrontEnd). |
| Tool | you should fill this in with the name of the tool used to construct the main target. For an application this could be Link, or in the case of a library this could be Libfile.
Note: Make requires this tool to be one which takes intermediate files and creates a final object. Such tools are Link (for a module or application), LibFile (for a library) or Squeeze (for a squeezed module or application). |
Having filled in these three boxes, you must then save the Makefile which will be used to hold all information for this project. This is accomplished either by dragging the Makefile icon to a directory viewer (having optionally changed the leafname from the default Makefile), or by typing in a full pathname and clicking OK. The directory in which the Makefile is saved is important. This directory is where the final targets for the project will be created, since each target will be saved in the @ work directory (see the section entitled Creating a final target for a project for an explanation of this). The sources for the project can be stored anywhere, since they will always be referenced relative to @. If any of the Name, Target or Tool icons have not been correctly filled in then an error is reported, and the Makefile is not created.
When this process has been completed, the newly created project becomes one of those maintained by Make, until it is explicitly removed (see the chapter entitled Removing projects for how this is done). The dialogue box which is used to maintain this project then appears, with the project's name in its title bar. The project can then be maintained as described below.
To maintain a project it is necessary to understand how to open and close projects, and how to specify the targets for a project.
Make keeps a list of all projects which it is maintaining at any one time. This list is shown when you enter the Open submenu from Make's application menu. When no projects are known about, this menu item is unselectable.
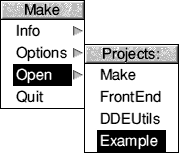
The list of project names is shown with the most recently registered project at the bottom. Clicking on a project name in this list will open a dialogue box for that project, with the name of the project in its title bar; if the project was already open, then the dialogue box is brought to the front of the WIMP's window stack. If the project is being opened for the first time, then the directory containing the Makefile for this project is also opened. The dialogue box is shown below:
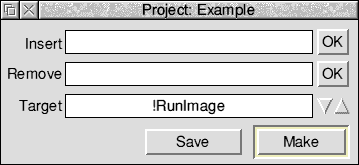
This dialogue box can be used to add new members to the project, remove members which are no longer required, make final targets, and select the current final target to which these operations refer. These are described in more detail in later sections.
When you have written a new source file or created a new object file which you wish to include in a project, you should drag the filer icon for that file to the icon marked Insert in the project's dialogue box menu. Typically, the only object files which you will need to insert in a project are external libraries. Any number of files can be dragged in this way to Insert, where their full pathnames are displayed, provided that the number of characters displayed does not exceed the buffer for the icon (4096 characters by default, but this can be changed by using a Wimp templates file editor).
Once you are satisfied that this is a list of all the files to be added to the project, click on OK to the right of Insert. The insertion will then take place. An asterisk appears in the title bar of the project dialogue box to indicate that this project has been modified since its Makefile was last saved.
If you wish to remove members from a project, follow the same procedure as that described for insertion, but drag file icons to the Remove icon instead, and click on OK to the right of Remove. Again an asterisk will appear in the project's title bar, to indicate that a modification has been made.
Note that insertion and removal applies only to the currently selected target when used in conjunction with multiple-target projects (see the chapter entitled Multiple targets for more details).
Make uses the following rule for dealing with files dragged to Insert: if the filename has, as its last but one component, a string (usually just one character) which corresponds to one of those registered by a translation tool, then it is assumed to be a program source file and a rule is constructed to make it into an object file; otherwise it is assumed to be an object file (such as a library) and will just be inserted into the list of objects which go to make up the current final target.
A list of the members which have been added to a project (and not subsequently removed) can be obtained in a scrolling text window by selecting the List members option from that project's dialogue box menu. The filenames in this list are expanded to full pathnames, whereas they will appear relative to @ in the Makefile for the project.
You can force a member of the project to be time-stamped using the Touch option in a project's dialogue box menu:
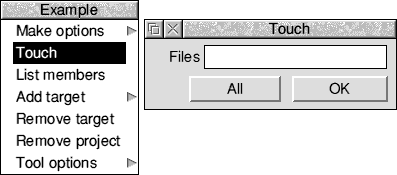
In the Touch dialogue box, you can type (or drag to it) the filename(s) of the file(s) to be touched (either relative to @ as it appears in the Makefile, or as a full pathname), and then click on OK. If you wish to touch all source members of the project, then click on All; in this case any filename in Files is ignored.
When a project is first created, it has just one final target - the one whose name is entered in the Target icon in the New Project dialogue box. This name will also appear in the Target icon in a project's dialogue box when that project has been opened. This target is referred to as the current target, and it is the target which will be made when you click the Make icon. The current target is also the one to which members are added or removed when you enter filenames in the Insert and Remove icons from a project's dialogue box.
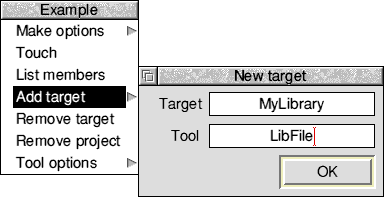
In order to add a new target, you should use the Add target option from a project's dialogue box. In the Add target dialogue box you must enter a name for the new target, and the name of the tool which is used to construct that target (e.g. MyLibrary and LibFile), as shown above.
Targets created in this fashion can be removed by choosing Remove target in the project menu. Remove target always applies to the current target.
When a project has its dialogue box open, the list of final targets can be traversed using the up and down arrow icons (next to the Target icon). You will notice that any targets which you manually insert in the user-editable section of the Makefile will also appear in the project dialogue box. This is so that you can select them as the target to be made when clicking on the Make icon.
This can be used to create a 'squeezed' image by doing the following:
If you used the example names above, and you now make the target !RunImage, you will get a squeezed final binary.
In order to make final targets and object files which will combine to make those final targets, a number of tools such as compilers, assemblers, linkers and library constructors will be used. These tools will typically have a set of options which are normally specified from a dialogue box when using the tools under the control of the FrontEnd module. It is possible to set the options for a particular tool's use under Make (for a given project) by following the Tool options submenu from the project's dialogue box menu.
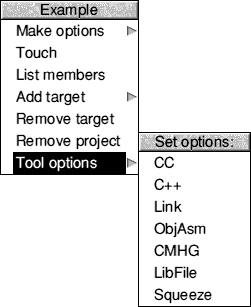
This will show a list of all the tools which have registered themselves for use with Make (for example, Cc, ObjAsm, Link etc). Clicking Select or Adjust on a tool's name in this list will result in the options dialogue box for that tool being displayed. This dialogue box can then be used to set the options for the tool; these will be translated into command-line options and entered into the toolflags section of the Makefile for the project.
A project can be removed from the list of projects maintained by Make by choosing Remove project from the project's dialogue box menu. This simply means that it is removed from the list of projects which can be opened from Make's Open submenu; the Makefile for the project is still retained.
You will also be asked if you want to remove the files which store the toolflags for the project. If you intend never to reinstate this project as one maintained by Make, then answer Yes to this query. If you are just temporarily removing this project from the list, then answer No, so that the toolflags state for this project is saved.
If you later wish to reinstate a removed project, this can be done by dragging the Makefile for the project onto the Make icon.
There are two ways of creating a final target for a project:
In both of the above cases, the amu program is run pre-emptively using the TaskWindow module to make the chosen target. The space available to load and start up amu is determined by the Wimp Next slot. If you get errors such as:
No writable memory at this address
when you run a Make job, try adjusting the Next slot.
The output from this process appears by default in a scrollable, saveable text window (or in a summary dialogue box if this option is selected in the Display submenu):
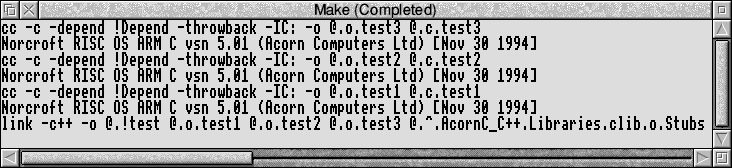
This window is read-only, you can scroll up and down to view progress, but you cannot edit the text without exporting it to an editor. To indicate this, clicking Select on the scrollable part of this window has no effect.
Clicking Adjust on the close icon of the output window switches to the output summary dialogue box:
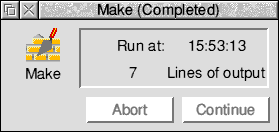
This box presents a reminder of the tool running (Make), the status of the task (Running, Paused, Completed or Aborted), the time when the task was started and the number of lines of output that have been generated (i.e. those that are displayed by the output window). Clicking Adjust on the close icon of the summary box returns to the output window.
Both the above output displays follow the standard pattern of all the non-interactive desktop tools. The common features of the non-interactive desktop tools are covered in more detail in the General features. Both output displays, and the menus brought up by clicking Menu on them, offer the standard features allowing you to abort, pause, or continue execution, save output text to a file, or repeat execution.
If you have made changes to a project, and wish these to be written back to the project's Makefile without actually making a target, then click on Save in the dialogue box.
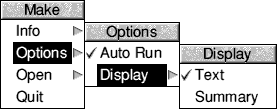
The Options submenu from the Make icon bar menu allows you to set two options: Auto Run and Display.
Selecting Auto Run means that when you double-click on a file of type Makefile (0xFE1) from a directory display, the AMU program is immediately invoked to make the first target found in the Makefile; if you do not select Auto Run, then double-clicking on a Makefile merely adds the project to Make's list of maintained projects (if it is not already there), and opens the dialogue box for that project (bringing it to the front of the WIMP's window stack if it is already open).
In the Display submenu, you can choose whether the output of all Make processes is displayed in a scrolling text window or in a summary dialogue box.
You can use a text editor to customise a project's Makefile. There is a section of the Makefile, following the active comment User-editable dependencies, which is left untouched by Make. All other sections of the Makefile will be over-written and so should not be edited using a text editor (unless you are thoroughly familiar with the operation of Make). The full format of a Makefile is described in Makefile format.
Note that the actual Makefile is only read in if Make is re-loaded and the project then opened, just re-opening the project without re-loading Make is not sufficient.
A good example of how this could be used, is to create a rule which removes an application's binary image and the object files used to create it, so that the next 'make' will remake all objects. This is done by entering in the user-editable section the following lines:
clean:; remove !RunImage
        wipe o.* ~cf
If a file of type Makefile, which does not comply to the Makefile format, is double-clicked, or if a file of type Text or Data is dragged onto the Make icon, it is not registered as a project. Instead Make runs the AMU program with this file as its input Makefile. This allows the use of Makefiles from other systems, and ones which do not fit into the project-oriented way of working required by Make.
The Makefile which is used to maintain a project is a file of type 0xFE1 (Makefile), and contains normal ASCII text. This text is arranged into a number of sections which are separated by active comments. For a detailed description of Makefile syntax see Makefile syntax.
Below, we describe each of these sections, beginning with their respective active comments:
| # Projectproject_name: | This gives a name to be used for the project in the Open submenu. |
| # Toolflags: | This section has a set of default flags for each of the tools which have registered themselves with Make, for automatic inclusion in a Makefile. The tool will have done this by writing lines (described in the Programmer interface) into:
Each macro in the Makefile will be of the type:
|
| # Final targets: | This section contains the rules for making the final targets of the project. For example:
This information is obtained when the project was created (from the Name and Tool icons in the New Project dialogue box). |
| # User-editable dependencies: | This section is left untouched by Make, and can freely be edited by the user. This allows rules to be added which are specific to a particular project; for example, it may copy sources from a file server to your local Winchester, before doing a compilation. |
| # Static dependencies: | This section contains rules for making an object file from corresponding source. It does not refer to include files etc. (described in Dynamic dependencies). |
| # Dynamic dependencies: | This section contains the rules which are created by Make by running the relevant tool on a source file to ascertain its dependencies (e.g. cc -depend). |
The following information is given for programmers wishing to add new desktop tools to be used with the Make application.
If you wish to use a tool with Make, which does not come with Acorn C/C++, you can use either of the following two methods:
A command-line tool which will be run under the control of the FrontEnd module (for setting its options in a Makefile), will need to append lines of the following format to the file <Make$Dir>.choices.tools:
| toolname | Name of tool |
| string | Extension |
| flags | Default flags for use by Make |
| rule | Rule for converting sources to objects |
| pathname | Full pathname of file containing application description |
| pathname | Full pathname of file containing Frontend setup commands |
All the above lines should be terminated by the C newline character \n.
When the user selects a tool name from the Tool options submenu, Make issues a star command to get the frontend module to start up a Wimp frontend for the chosen tool (without an icon appearing on the icon bar). The setup dialogue box for that tool is then displayed, with the Run icon replaced by an OK box.
The user can then set options for that tool. A suitable set of command-line options is returned by the generalised frontend, to be used as that tool's toolflags entry in the Makefile.
If the star command fails (presumably because the frontend module is not active or because there is no description for the chosen tool), then Make broadcasts a WIMP message (recorded delivery), to see if any application can deal with the request. This is to allow expansion of the system to incorporate other WIMP-based compilers, assemblers, etc., which other parties wish to provide for use under the control of Make.
The WIMP message has the format:
| Byte offset | Contents |
|---|---|
| +16 | DDE_CommandLineRequest (reason code) (&81401) |
| +20 | Make's internal handle |
| +24 ... | null-terminated application name |
If you have written an application which needs to respond to this message, then your application should:
| Byte offset | Contents |
|---|---|
| +16 | DDE_CommandLineResponse (reason code) (&81400) |
| +20 | Application's handle |
| +24 to +36 | Application's name |
| +36 ... | null-terminated command-line options |