
|
www.riscos.com Technical Support: |
- Copying within a directory
- Copying between directories
- Moving files
There will be many occasions when you wish to make a copy of a file. You might need to do this for security reasons, keeping a copy in case your original is accidentally deleted or the disc is damaged, etc. or you may want to make a copy of a document before you make alterations to it so that you can revert to the previous version if necessary.
This chapter will describe the actions to copy a single file or group of files but the procedures are exactly the same for copying a folder or group of folders.
As previously described this option is found on the Selection sub-menu of the Filer menu. You must use this method to copy within a directory as this is the only way you can give a different name to the copy. You must do this when copying in the same directory since you can't have two files or directories (or a file and a directory) with the same name in a directory.
Begin by either selecting the file or folder you want to copy or placing the mouse pointer over the object you want to copy when you press MENU to open the Filer menu. Because you must rename objects when copying in the same directory and you can only rename one object at a time if more than one object is selected when you open the Filer menu you will find that the Copy option is feint and can't be used.
Assuming that you have only selected a single object slide the mouse pointer off Copy on the Selection sub-menu to open the Copy window. This is similar to the New Directory window previously described and you use it in a similar way.
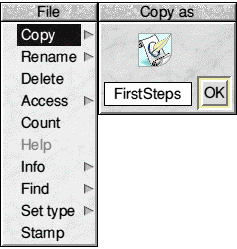
The name of the selected file or directory will appear in the Copy window. You will need to alter this or delete it and enter a completely new name. When you have done this either press the Return key or click on the 'OK ' button and the file or directory will be copied.
With a file this will probably be very quick, unless it's a very large file, but if you are copying a directory the operation may take some considerable time, especially if it contains a large number of files. During this operation a Filer Action window will open (unless Verbose has been set Off) to display progress, although if you are copying just a single file it's appearance may be so brief as to be almost unnoticeable.
You will almost certainly find that you need to do this much more often than copying within the same directory. The easiest way to copy objects to another directory is by dragging. The destination directory can be a different directory on the same drive or on a completely different drive, for example, copying from a floppy drive to a hard drive or visa versa.
The following exercise will illustrate this.
Using the method described above you are not restricted to copying one file at a time. If you select a group of files or directories or a mixture of both then they will all be copied.
Select all the files or directories you want to copy by any of the methods described in Chapter 3. Now place the mouse pointer over any of these selected objects and click and hold down the ADJUST button and drag it to the destination directory. All the selected objects will be copied.
Note that you must use the ADJUST button for this to work properly, not SELECT . If you try to use SELECT then, as we have already seen, the object the mouse pointer is over when the button was pressed will be selected all all the others will be de-selected, so only that single object would be copied.
When you drag a file or directory to copy it the copy will have the same name as the original. There may be times when you want to give the copy a new name. For example, if you were writing a book the original might be called MyBook but you might want to keep backup copies at various stages called, say, MyBook1, MyBook2, MyBook3 , etc.
You can use a variation of the method used to copy within a directory to simultaneously copy and rename a file or directory.
Open a directory viewer for the directory you want to copy to so that you have both source and destination directories visible. Now use the method described in Copying within a directory but, after changing the name don't press the Return key or click on 'OK '
You will see an icon in the centre of the window. This will be the same as the icon for the file or application you are copying or, if it's a directory, it will be the folder icon. Drag this icon to the destination directory viewer and the object will be copied.
Obviously you can't use this method for copying multiple files or directories, only one at a time.
You can also copy directories and their contents using this method, but only the name of the directory you are actually copying will be changed, the contents remain the same.
The procedure for moving files is almost identical to copying by dragging but with one important difference. Before you hold down the SELECT or ADJUST button on the mouse, with your other hand press and hold down either Shift key on the keyboard.
Now drag the object or objects just as if you were copying them, but if you keep the Shift key held down while you drag them you will find that the files will appear in the destination directory but will have vanished from the source directory; that is, they have been moved instead of copied .
If you are moving files between directories on the same drive this will be very fast. Even if you are moving a directory containing a lot of large files it will still be extremely rapid. This is because the actual files on the drive aren't physically moved to the new location, it's only necessary to re-arrange some of the information that describes where they appear in the directory structure.
If you are moving data between drives then it will be a lot slower. This is because the filer then has to actually copy each file in turn to the new location, then delete the original. Obviously this takes a lot more time, slightly longer than copying.
While you are carrying out any copy or move operations or any other operations which involve writing to the hard drive it is very important that you do not switch the computer off.
It is good practice to always use the proper Shutdown procedure before switching off anyway (see later), but if you switch off while file operations are being carried out there is a very high risk that some of the data on your hard drive could become 'scrambled' making the drive unreadable.
This won't permanently damage the drive, but you could have lost all your files and data forever.
Never move the computer while the drive is being read from or written to. It's a good idea not to move it while it's switched on anyway, but if the computer is jarred or shaken while the hard drive is in use it is possible for the read/write head to make contact with the drive platter. This can result in permanent damage.
Earlier I described the use of Rename on the Selection sub-menu of the Filer menu. Previously this was the only way of renaming files or directories. It is retained for backward compatibility, but RISC OS 4 has a much simpler method.
To rename a file or directory place the mouse pointer over it's name (not the icon itself) in a Filer window and click SELECT while holding down either Alt key. You'll find these keys at either end of the spacebar. The area in the Filer window where the name was will now change into a writable icon as shown below. Alter the name in the icon, then press Return and the name will be changed.
If you make a mistake and don't want the name to change then press Escape or click the mouse anywhere else in the filer window. The rename icon will vanish leaving the original name unaltered.
There are some reserved characters that you cannot use in RISC OS file or directory names. Most of these are not permitted because they have some 'special meaning'. For example, we have already said that you should not use '!' as the first character of a directory name as RISC OS assumes that any directory name beginning with '!' is an application directory.
The following characters are not allowed -
$, %, &, *, #, @, ", |, ^, and the full stop '.' and colon ':'
You can't use a space in a file or directory name. An alternative if you want a separator between words is the underscore character '_' but if you really do want a space you can use Alt-Space, that is, hold down the Alt key when you press the spacebar. This produces ASCII character 160 instead of 32 (the 'normal' space) and as this character is defined as a blank in most fonts it will still look like a space but, since it actually isn't one, it's permitted.
It is also best not to use the forward slash '/' character as although this isn't forbidden it has a special meaning described below.
It is bad practice (and ugly) to use all upper case names. In case 'ugly' and 'difficult to read' aren't enough there is also a practical reason. With most fonts, especially the default Homerton, upper case letters are a lot bigger than lower case, so names are longer and even quite short names may be too long to fit in the space allocated in a filer window. This means that the end of the name might not be visible. For example -
LatestVersion
LATESTVERSION
but the all upper case name might appear as -
LATESTVERS
even if the mixed case version fitted in the space provided with room to spare.
As we said earlier RISC OS identifies files by their Filetype . This is specific to Acorn format discs, and most other operating systems, including CD ROMs, use a system known as the Dot Extension. This means that after the descriptive name of the file there is a full stop (the 'dot') and then a three (now sometimes four) letter extension which defines what type of file it is.
Some extensions are specific to particular programs but many of them are more general, such as TXT for a plain text file, JPG for a Jpeg graphic image, ZIP for a compressed Zip file, and so on.
Since the full stop is not allowed in RISC OS filenames there has to be another way of representing these extensions. This is done by substituting the '/' (forward slash) character. This means that if you are looking at a CD ROM or DOS format disc in a filer window you would see 'README/TXT' instead of 'README.TXT'.
RISC OS has a module called MimeMap which, when it sees a file on a CD ROM or DOS format disc with an extension that it 'knows' about, displays it with an equivalent RISC OS filetype icon, thus making it mush easier to identify the type of file.
If you want to transfer a file to a computer running another operating system, for example, Windows, you can do so on a DOS formatted floppy disc, but you would need to add the appropriate extension, using '/' instead of a full stop. If you don't do this then the other machine won't know what type of file it is.