 |
www.riscos.com Technical Support:
RISC OS 3 User Guide |
| |


RISC OS 3.7 User Guide
11 - PrintEdit
This chapter provides an introduction to PrintEdit, an application which enables experienced users to edit existing printer definition files and experts to create them from scratch. It's unlikely that you'll need the information in this chapter, but it's provided for reference.
Printer definition files are used by the printer manager application !Printers. They define how the operating system translates the characters in the document into signals that can be used by the printer to print the document.
Creating new printer definition files
Creating printer definition files is technically very complex and requires a deep understanding of how printers work. This chapter gives you only a very brief introduction and you should not expect to be able to design your own printer definition files using the information provided here alone. The chapter Printer definition files in the RISC OS 3 Programmer's Reference Manual contains the detailed information you will need for creating printer definition files.
Modifying existing printer definition files
Occasionally, step-by-step instructions might be issued, for example, by Acorn or another printer supplier that tell you how to modify an existing printer definition file to change its use slightly.
The instructions list the exact operations you need to perform in each PrintEdit window. You will not need a full understanding of the features of PrintEdit.
This chapter gives you an overview of the functions of PrintEdit. This chapter should give you enough information to enable you to use PrintEdit to alter one of the existing printer definition files.
Before you can use PrintEdit you should
- have the user guide and technical manual for your printer, or
- have some step-by-step instructions from an expert.
Most people use PrintEdit to alter one of the existing printer definition file configurations, rather than make up a completely new one. So we shall use the printer definition file for the Epson FX85 as an example.
Starting the application
To start the application:
- Double-click on the Printing directory icon to open the directory.
- Double-click on the !PrintEdit icon. The application icon will appear on the icon bar.
To load an existing printer definition file:
- With the Printing directory display open, double-click on the Printers directory
- Open the printer directory that corresponds to the printer you wish to modify.
- Select the printer definition file you require and drag it over the PrintEdit icon on the icon bar.
Note: You can also load non-PostScript printer definition files by double-clicking on them.
The PrintEdit window
The appearance of the PrintEdit window when the Epson FX85 definition file is loaded is shown below:
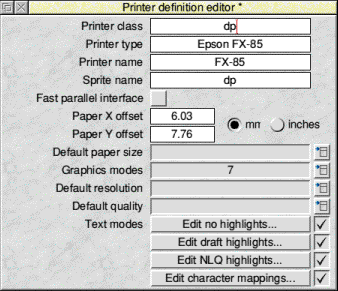
- The Printer class represents a type of printer; it determines which processing type Printers uses for the printer. Use dp for dot matrix and other bit-image printers and lj for HP LaserJet compatibles. This application cannot be used for defining printer definition files for PostScript printers.
- Printer type is the full name of the printer. If you are creating an alternative version of a standard printer definition file, alter this name.
- Printer name is the name you want to appear underneath the printer icon on the icon bar. The name can be up to 10 characters long. If you are creating an alternative version of a standard printer definition file, alter this name.
- Sprite name is the sprite to be used as the printer icon on the icon bar. These can again be dp for dot matrix and other bit-image printers and lj for HP LaserJet compatibles. You can also define your own sprites for this icon.
- If your printer can use the Fast Parallel Interface then choose this option. Check in the printer ReadMe file for information; if you're not sure, don't use this option.
- The paper offsets represent the top (Y) and left (X) sections of the paper on which the printer cannot physically print.
- The Paper Y offset is the amount of cut sheet paper which has already gone past the print head before it can print anything; this differs for different printer models.
- The Paper X offset is the small section at the lefthand edge on which the head cannot print, although why this is so is not always obvious. Together the paper offsets define the logical (0,0) origin on the physical paper. The Printers.Read_Me file contains details on using the Printers.Top_Left file to set the offsets for Epson and IBM-compatible dot matrix printers. Offsets only affect graphics printing.
- Default paper size defines the standard paper type used by the printer.
- Graphics modes displays how many graphics modes have been defined for this printer.
- Default resolution defines the resolution that will be picked when you first install the printer.
- Default quality defines the print quality that will be picked when you first install the printer.
- Text modes defines the type of text modes your printer can use. Find this information out from your printer manual.
- Edit no highlights defines the simplest print options of plain text only.
- Edit draft highlights includes all the standard highlights such as bold, italic, superscript and subscript in draft mode.
- Edit NLQ highlights is the same as Edit draft highlights but for the NLQ (Near Letter Quality) mode.
- Edit character mappings allows a character from the Acorn ISO8859 character set to be converted to the same character in the printer's character set.
The differing text mode titles (Edit portrait mode and Edit landscape mode rather than 'Edit no highlights', 'Edit draft highlights' and 'Edit NLQ highlights') are set up by PrintEdit when the Printer class is lj. The information is still stored in exactly the same way as for Epson and IBM-compatibles.
For the rest of this chapter you should have your printer manual ready so that you can look up the information required by PrintEdit. It may also help to have the Help application active, as this will give you quick summaries about the function of each field in the dialogue boxes.
Graphics mode
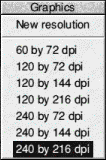 |
Display the Graphics modes dialogue box by clicking on the right arrow by the Graphics modes entry. Choose an existing resolution to edit or New resolution if you want to start afresh. In most cases it is probably easier to edit an existing file and tailor it to your needs. Here is the Graphics mode window for the Epson at a resolution of 240x216dpi. |
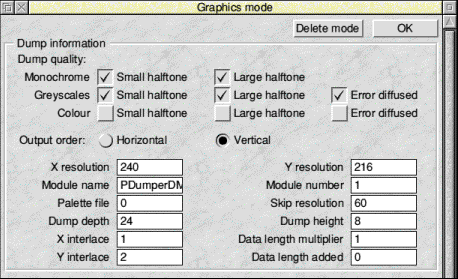
Dump information
The first part of the window gives the Dump information - the information the printer uses to print correctly.
The Dump quality boxes should normally all be ticked, as the software supports these features on all printers. However, don't tick the colour options unless you have a colour printer.
- Output order defines how the image is printed. Most printers, like the Epson, use Vertical. Some, like the Integrex, use Horizontal. Note that when Horizontal order has been selected many of the other Dump information and Dump strings settings either become irrelevant, or must be set to certain values.
- X (horizontal) and Y resolution (vertical) define the graphics resolution in dots per inch. These should be given in your printer manual, but may be in different units. The printer manual will usually quote resolutions before vertical interlacing has been applied (see later), so in this case the manual would quote 240x72dpi, rather than 240x216dpi (since 216/3 = 72). The manual is also likely to give dots per line rather than dots per inch for the horizontal resolution; for example, 960 dots per line on 8 inch paper is 120dpi horizontal resolution. The vertical resolution is often omitted altogether, in which case it is likely to be 72dpi for 9-pin printers, 180dpi for 24-pin printers doing 24-pin graphics, 60dpi for Epson 24-pin printers doing emulated 8-pin graphics, and 72dpi for IBM 24-pin printers doing emulated 8-pin graphics.
- Module name and Module number define the dumper files used by the printer. These are currently four dumper files, although more can be defined if needed.
PDumperDM: Module number 1 (dot-matrix and other bit-image printers)
PDumperLJ: Module number 2 (HP LaserJet compatible printers)
PDumperIW: Module number 3 (Apple Imagewriter II compatible printers)
PDumperE2: Module number 6 (ESC/P2 compatible printers, such as the Epson Stylus Colour printer)
- Palette file defines the Palette file - this is currently set to zero or one.
- Skip resolution defines the leading zero skip resolution of the dump. This is always 60 for Epson printers and 120 for IBM printers.
- Dump depth is the depth of one group of interlace passes.
- Dump height is the number of rows of pixels in each vertical pass. This is the same as the number of pins on the print head; a 24-pin printer would print 24 dots.
- X interlace defines the number of horizontal interlace passes.
- Y interlace defines the number of vertical interlace passes.
- Data length multiplier and Data length added. For Epson printers, you specify a line of graphics by saying '<27><42><0><number of columns>'. For IBM printers, you need '<27>[g<number of columns times 6 (or 3) plus 1><graphics mode>'. So, for Epson printers, the Data length multiplier is 1 and Data length added is 0. For IBM printers, Data length multiplier is either 6 or 3, and Data length added is 1.
Additional Dump information for Printer Class lj
Copies should be selected if the printer supports this option.
Compression should be selected if the printer supports this option.
The Output order choices do not apply for this class of printer.
Dump strings
The second part of the window gives the Dump strings (use the scroll bar to see this).
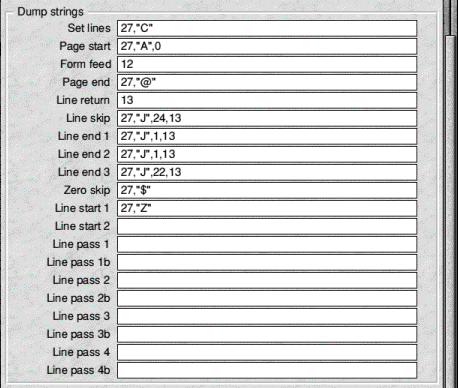
These are codes sent to the printer that tell it to perform certain actions.
- Set lines is the string set to define the number of lines per page.
- Page start is the string sent at the start of a page.
- Form feed is the form feed character. The string sent to the printer to tell it to form feed the paper after each page has been printed.
- Page end is the string sent at the end of each page.
- Line return moves the print head to the beginning of the line. Usually this will be a carriage return.
- Line skip moves the print head to the beginning of the next line. It is used for skipping entirely blank lines.
- Line end 1 to Line end 3 are the strings sent at the end of each vertical interlace pass. There can be up to three passes.
- Zero skip is issued to skip leading zeros on graphics data lines, hence optimising out the white section at the left hand edge of the paper.
- Line start 1 is the string sent at the beginning of a graphics line. For Epson printers, Line start 2 is not needed. For IBM printers, Line start 2 must be '<graphics mode>', while Line start 1 is '<27>[g'.
- Line pass is the string sent for each pass of a colour graphics dump. There can be up to four passes.
Text modes
Almost all printers can use the first two text modes and many also support an NLQ (Near Letter Quality) mode.
Choose which text modes your printer will use by clicking on the cross or tick next to each Text mode button. Changing to a tick allows you to select that mode.
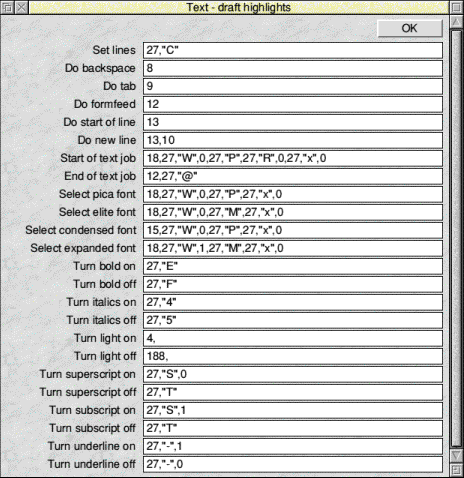
Display the text mode window by clicking on the appropriate text mode button. Here are the Text draft highlights settings for the Epson FX85.
Edit no highlights
The no highlights mode is a very simple mode without any special effects, so most of this window is blank.
- Set lines sets the number of lines per page.
- Do backspace moves the print head back one space.
- Do tab moves the print head to the next tab.
- Do formfeed starts a new page.
- Do start of line moves the print head to the start of the line.
- Do new line moves the print head to the beginning of the next line.
- Start of text job is the string that denotes the start of a text print.
- End of text job is the string sent at the end of a text print.
Edit draft highlights
The draft highlights mode uses the same basic definitions as the no highlights mode, but expands this to include pica, elite, condensed, expanded, bold, italics, light, superscript, subscript and underline printing.
- Select pica font sets pica font (10cpi).
- Select elite font sets elite font (12cpi).
- Select condensed font sets condensed font (17cpi).
- Select expanded font sets expanded font (6cpi).
- Turn bold on sets bold text on.
- Turn bold off sets bold text off.
- Turn italics on sets italic text on.
- Turn italics off sets italic text off.
- Turn light on sets light text on.
- Turn light off sets light text off.
- Turn superscript on sets superscript text on.
- Turn superscript off sets superscript text off.
- Turn subscript on sets subscript text on.
- Turn subscript off sets subscript text off.
- Turn underline on sets underline text on.
- Turn underline off sets underline text off.
Edit NLQ highlights
The NLQ highlights mode uses the same basic definitions as the draft highlights mode, but alters these to enable the printer's NLQ operation.
Edit character mappings
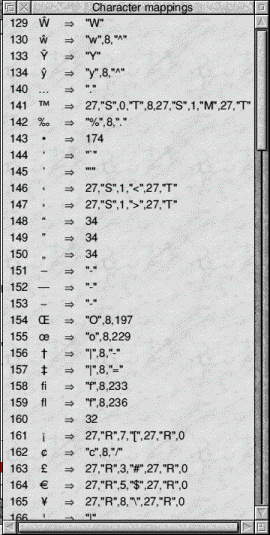 |
Edit character mappings allows a character from the Acorn ISO8859 character set to be converted to the same character in the printer's character set. Although all the standard characters normally map directly onto the corresponding printer characters, the top-bit-set characters normally need mapping from Acorn's character set to the printer's character set.
Mapping is done from the Edit character mappings window. Here is part of the Epson FX85's character mappings.
The number down the left column represents the Acorn character in decimal; next to it is the Acorn character itself. To the right of the arrow are the commands sent to the printer that reproduce the same character. |
Modifying an existing mapping
To alter an existing mapping:
- Press Menu over the character to display the Mappings menu.
- Choose Mappings/Modify to display the Modify mapping dialogue box.
- If you want to modify the printer commands, type the printer commands that produce the character in the Maps to box.
- Press Return to modify the mapping list.
Entering a new character mapping
To enter a mapping:
- Press Menu to display the Mappings menu.
- Go to the New mapping dialogue box and type in the Acorn character to map in the Character box. You can type in the Acorn character directly from the keyboard, by using the Chars application or by using its decimal character code.
- Type the printer commands that produce the same character in the Maps to box.
- Press Return to add the mapping to the list.
Saving and quitting
When you have finished making changes to your the printer definition file, save the modified file by clicking Menu over the main Printer definition editor window and choosing Save.
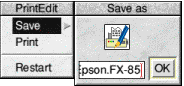
If you want to discard any changes you have made and start again click on Restart.
To finish using the application, chose Quit from the icon bar.
RISC OS 3.7 User Guide - 21 JAN 1997
This edition Copyright © 3QD Developments Ltd 2015
Last Edit: Tue,03 Nov 2015