
|
www.riscos.com Technical Support: |
Alarm is a sophisticated alarm clock.
| Alarm is in the Apps icon bar directory display. To start the application, double-click on the !Alarm application icon. The clock icon appears on the icon bar showing the time. |
If you are setting the time during the summer months you should check to see if your country is running daylight saving time. If it is you should click on the BST option before setting the time.
To display the Set clock dialogue box, click Menu over the Alarm icon on the icon bar and choose Set clock.
To change the time and date click on the appropriate arrows in the Set clock dialogue box. Click on BST if British Summer Time is in operation.
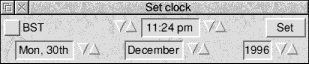
Finally click on Set to set the clock to the new time.
| This section shows you how to set an alarm using the Set alarm dialogue box. To display the Set alarm dialogue box, click on the time display icon on the icon bar, this will open the Set alarm dialogue box. |
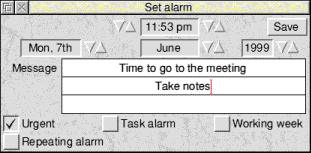
This is the dialogue box used to set the alarm date and time; you can also type in some text which will be displayed as a message on screen when the alarm goes off.
To set an alarm:
When an alarm is set, the box surrounding the time display on the icon bar changes colour.
The following options are also on the Set alarm window:
You can mark an alarm as urgent by clicking on the Urgent box. It will then sound an audible alarm when it goes off, even if you have selected the Silent option from the setup dialogue box menu (see Configuring the Alarm setup options).
Instead of merely giving you a message when an alarm goes off, Alarm can carry out a task. A task can be anything you can do on the Desktop or command line: running a program or loading an application, for example. Click on the Task alarm box and enter the command you want carried out in the message boxes. You can also set up a Task alarm by dragging a file onto the Set alarm window. If you drag an application onto the window, for example, that application will run at the time set for the alarm. If you drag a text file, the text will be displayed in an Edit application window; you might use this option to display, at the start of the day, a list of things you have to do.
This limits the alarm settings for any repeating alarms to be within the specified working week; the working week is defined in the Alarm Setup window, and is Monday to Friday by default. This option only takes effect if the Repeating alarm option is also selected.
If you have set an alarm that falls outside the working week it will always go off on the last working day before the appointment. This is to prevent you missing an appointment that is scheduled outside the working week.
Any changes to the working week affect all Alarms, including those already set and saved.
You can set an alarm to go off more than once by switching the Repeating alarm option on.
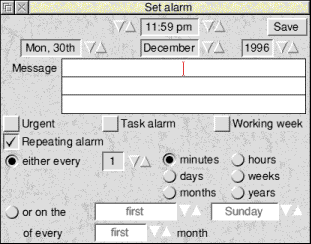
Choose whether you want the alarm to repeat at a set time (for example, every 19 days) or on a set day (for example, every second Monday of every second month).
Alter the repeat interval by clicking on the arrow boxes, and by selecting the unit in which the interval is measured from the buttons shown. To limit just the current alarm to the working week, click on the Working week box. To limit all your alarms to the working week by default, choose the Repeating alarms option in the setup dialogue box.
You can set more than one alarm by simply repeating the Set alarm procedure.
When the alarm time is reached, a window similar to the one below appears on the screen.
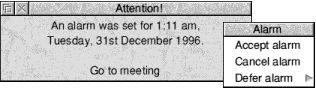
When a repeating alarm goes off, click Menu on the alarm window. Choose Accept alarm to stop the alarm and remove the window, leaving the alarm set for next time, or choose Cancel alarm to stop it going off again.
If it is not a repeating alarm, cancel the alarm and remove the window by clicking on its Close icon. Alternatively, click Menu on the window and choose Accept alarm. If you wish to defer the alarm (like using a 'Sleep' button on an ordinary bedside alarm clock) choose Defer alarm, and select the time interval by which you want to delay the alarm. This then leads to a menu into which you can enter the number of minutes, hours, etc. If your alarm repeats every so many minutes or hours, it will be deferred from the current time. If its repeat unit is longer, it will be deferred from the alarm time.
If Alarm is not running when the alarm is due to go off, the alarm will be triggered next time Alarm is started. If the alarm is a repeating alarm, you will receive a message for the first repeat due for the period when Alarm was not running, but not for subsequent ones.
The setup dialogue box allows you to configure
If your computer is locked (password protected) you won't be able to change any Alarm setup options until it is unlocked.
To change the Alarm setup options click Menu over the Alarm icon on the icon bar and select Setup from the menu to open the Setup window.

Change the dialogue box options to suit your needs and then click on OK box. This saves the new options for your current session. However when your computer is reset, these changes will be lost.
You can save these changes permanently in a Desktop boot file.
When this is selected, only urgent alarms sound an audible beep at alarm time. When it is not selected, all alarms sound an audible beep.
When this is selected, any subsequent repeating alarms you set, or alarms that you defer, will skip those days you have not selected. An alarm repeating monthly or annually will go off on the working day before its due date.
Click on this box if you want an audible alarm to sound continuously until you cancel the alarm.
Turn beep off after
The figure you type into the box is the number of seconds that the computer's beep will sound when there is an alarm.
This option lets Alarm automatically update the alarm database file whenever you set or change an alarm. If you choose this option then each time Alarm starts it automatically remembers any alarms that have been stored. (If your hard disc is locked, you'll see an error box.)
This section allows you to choose how you wish the alarm clock to be displayed on the icon bar. The formats available are:
For example, try typing in these formats in the User defined box.
%z12:%mi:%se %pm %zdy/%zmn/%zyr
or
%we %zdy%st %m3 Week %wk
For information on how to set up your own formats, see the section Time and date display formats. The format and other features you select for Alarm will be saved in any Desktop boot file you create (providing Alarm is running when you save the file). These options are listed at the end of this chapter. For information on how to create a Desktop boot file, refer to the section Customising the desktop start-up procedure.
When this option is selected, Alarm will automatically switch between GMT and BST times on the dates you specify. Click on the arrows to change the time, day, month and year.
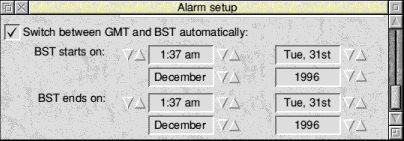
A reminder alarm is automatically set to go off 11 months after the start of BST; this is to remind you to set the GMT/BST time for the following year.
Choosing Alarms from the icon bar menu displays the alarm browser. The browser lists the alarms you have set.

Clicking Menu over the browser window displays the menu options available for setting, changing, copying, deleting and saving alarms.
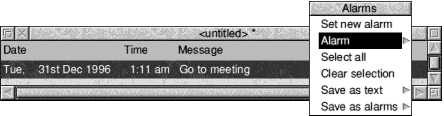
Choosing this option displays the Set alarm dialogue box.
This option is only available when an alarm is selected. Select an alarm by clicking on an alarm line in the browser.
This option displays a submenu which allows you to perform the following operations:
Selects all alarms in the browser.
Deselects all selected alarms in the browser.
This option saves the selected alarm text (as seen in the browser) as a text file. Drag the Save as text file icon to an appropriate directory.
You can load this text file into Edit to display a list of all your currently set Alarms, or, if you have a printer driver installed, drag the icon straight onto the printer driver icon to print the list on paper.
Note: If you save the Alarms file into the $.Public directory on your hard disc, it will be updated even if the disc is locked.
To close down Alarm, choose Quit from the icon bar menu. Alarm will warn you if you have any alarms that have not been saved.
| Alarm files contain information about the current alarms. If you double-click on an Alarms file and Alarm is not running, then Alarm is started and the data file is read and treated as the main alarm file. If you double-click on an alarms file and Alarm is currently running, the contents of the alarms file is added to the existing list of alarms, if there are any. |
If you create a Desktop boot file while Alarm is running, it will incorporate any changes you have made to its setup and display. You can also manually edit your Desktop boot file to incorporate these changes. See Configuring applications for more information.
Use the Setup window to change the date and time format by choosing the User defined option and specifying a string made up of time and date variables as listed below.
| Variable | Meaning | Example |
| %se | seconds | 59 |
| %mi | minutes | 05 |
| %12 | hours in 12 hour format | 07 |
| %24 | hours in 24 hour format | 23 |
| %am or %pm | 'AM' or 'PM' | pm |
| %we | weekday, in full | Thursday |
| %w3 | weekday, in three characters | Thu |
| %wn | weekday, as a number | 5 |
| %dy | day of the month | 01 |
| %st | 'st', 'nd', 'rd' or 'th' | st |
| %mo | month name, in full | September |
| %m3 | month name, in three characters | Sep |
| %mn | month as a number | 09 |
| %ce | century | 19 |
| %yr | year within century | 87 |
| %wk | week of the year, Mon to Sun | 52 |
| %dn | day of the year | 364 |
| %tz | Timezone | BST |
| %% | insert a % |
Numbers are generated as a fixed-width with leading zeros (e.g. %mi can give a result of 05). To remove leading zeros, prefix the code with a z (e.g. %zmi gives a result of 5). Plain text can also be included in the variable string; for example:
%we the %dy%st %m3 %yr
would display in the form:
Wednesday the 21st Jan 95
