| First Steps in Programming RISC OS Computers |
|
| Martyn Fox |
Chapter 13 : File Handling and Databases
We've only used files for storing Basic programs so far, but we can use files for other purposes besides. A wordprocessor uses files to store its text, Draw and Paint use them to store drawfiles and sprites and Maestro uses them for music. You can save anything in a file and retrieve it again, as long as it consists of numbers which the machine can handle.
Start up your text editor, create a text file and type in:
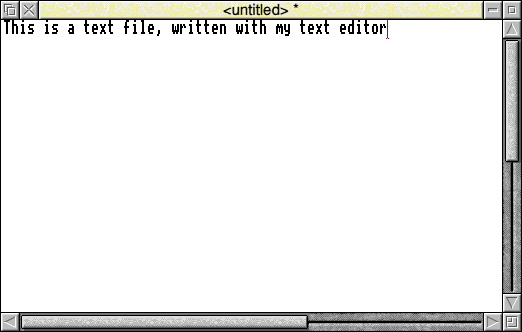
Don't press Return at the end but save the file in the currently selected directory, using the filename 'MyText', then start up Basic, either using the command line or in a task window
We're going to load this short text file into memory and look at it. To do this, we need to know where we can put it, so type:
PRINT ~PAGE
As we saw in Section 9, PAGE is the address where Basic stores the start of the program and the tilde (~) character makes sure it is shown as a hexadecimal number.
We also saw that you'll probably get a value for PAGE of &8F00. It's best not to interfere with the first few bytes starting at this address so, to keep clear of it, we'll load our text file 256 bytes further on, at &9000.
Loading in a Text File
As we're not loading a Basic program, we don't use a Basic command but a star command to let the operating system do the job for us. The command is (would you believe it?) *Load, and it usually has to be followed by the address where the first byte of the file is to go, so type:
*Load MyText 9000
Your text file will now be loaded at this address. Star commands usually assume that addresses are hexadecimal, unless you tell them otherwise.
We can look at the file using the *Memory command. Try typing:
*Memory 9000
and you should see something like this:
Address  :     3 2 1 0     7 6 5 4     B A 9 8     F E D C :    ASCII Data
00009000 :    73696854    20736920    65742061    66207478 : This is a text f
00009010 :    2C656C69    69727720    6E657474    74697720 : ile, written wit
00009020 :    796D2068    78657420    64652074    726F7469 : h my text editor
00009030 :    00000000    00000000    00000000    00000000 : ................
00009040 :    00000000    00000000    00000000    00000000 : ................
00009050 :    00000000    00000000    00000000    00000000 : ................
00009060 :    00000000    00000000    00000000    00000000 : ................
00009070 :    00000000    00000000    00000000    00000000 : ................
00009080 :    00000000    00000000    00000000    00000000 : ................
We saw the use of this command in Section 9. Each line shows the contents of 16 bytes, with the address of the first one on the left-hand side, and each group of four bytes is shown with the low byte on the right and the high byte on the left. Being a text file, each byte contains the ASCII code for a character. The section on the right-hand side of the screen shows the bytes turned back into characters which is, hopefully, the text you started with.
Cleaning Up the Memory Block
You will quite likely find that the bytes following your text don't contain zeros as shown, but various other characters. This part of the memory wasn't over-written when you loaded your file. If you want to, you can clean it up before you load the file by typing:
FOR N%=0 TO 252 STEP 4:N%!&9000=0:NEXT
This short program puts zero into four bytes each time round the loop.
The display shows 256 bytes which is what you get if you don't tell the machine otherwise. You can show, say, just the first three lines (48 bytes) by typing:
*Memory 9000+30
The number after the plus sign is the amount of memory to be displayed, in hexadecimal form. If you want to see more than 256 bytes (&100), it's best to put the screen into page mode by typing Ctrl-N, to stop the display scrolling up the screen too fast to be seen.
If you wanted to save this section of memory as a file, you would use the *Save command. Besides the start address, the operating system also needs to know how big the block of memory is that you want to save so you have to tell it that as well. There are two ways of doing this:
*Save MyFile 9000 9100

*Save MyFile 9000+100
Both these commands will save 256 (&100) bytes starting at &9000. The first command works by telling the machine the end address of the section to be saved and the second by telling it the length of the section. Note that the second number in the first example is actually the address of the first byte not to be saved - the machine saves 256 bytes from &9000 to &90FF.
Saving a Block of Memory
We saw in Section 9 how we could define a block of memory and use indirection operators to put single bytes, four-byte words and strings into it. To remind you, we used a program like this:
      10 REM > Bytes2
      20 REM illustrates indirection operators
      30 DIM block% 100
      40 ?block%=&00
      50 block%?1=&11
      60 block%?2=&22
      70 block%?3=&33
      80 block%!4=&87654321
      90 $(block%+8)="Hello There"
     100 OSCLI ("Save MyFile "+STR$~block%+"+20")
We've changed the filename slightly in the first line and rewritten the last line. Instead of showing us the address of the block, it now saves the block as a file.
If you run this program in Basic's command mode and then type:
PRINT ~block%
The machine will tell you the address of the start of the block and you'll probably get a figure something like &8FF0. Armed with this information, we can see what's in the block by typing:
*Memory 8FF0+20
which will show us:
Address  :    3 2 1 0    7 6 5 4    B A 9 8    F E D C :      ASCII Data
00008FF0 :   33221100   87654321   6C6C6548   6854206F :   .."3!Ce...Hello Th
00009000 :   0D657265   00000000   00000000   00000000 :   ere.............
To save this section, we would have to give the machine the command:
*Save MyFile 8FF0+20
Unfortunately, we can't put this command into the program as it stands because we won't know the actual address of block% while we're writing the program. It depends on the length of the program itself and the amount of memory that's allocated to other variables before the program gets round to defining block%. It's also possible that a future version of RISC OS could set PAGE to a different value, which would change the starting point of the program in memory.
It is generally not good practice to use addresses directly in this way; it's better to quote the names of the Basic variables which contain them. Unfortunately we can't put block% into a star command. This is because star commands aren't handled by Basic, but by the operating system's Command Line Interpreter, which doesn't understand Basic variables.
Using Basic Variables in a Star Command
What we need to do is to get the program to construct a string for us containing the command and pass that on to the CLI. This is what the OSCLI command in line 100 does. The first part of the string is spelt out in quotes, consisting of 'Save MyFile ', with a space on the end before the closing quote. The next part is the address, which is provided by STR$. This keyword works out the value of whatever follows it (block%, in this case) and turns it into a string. The tilde (~) sign means the string is in hexadecimal form. Finally, the last part of the string is again in quotes, giving us '+20'. If the value of block% is &8FF0, the entire string will be:
Save MyFile 8FF0+20
which is precisely what we want, and OSCLI passes it to the operating system. Notice that an OSCLI command doesn't need a star at the beginning because Basic already knows that it is to be handled by the Command Line Interpreter.
When you run the program it will save the block as a file called 'MyFile' or whatever you chose as a filename. You can load the file back into any suitable address and look at it with the *Memory command to prove that it worked.
Handles and Random Access Files
Everything we've done with files so far has consisted of saving and loading entire files in one go. It is also possible to read or change individual bytes within a file, or add something onto the end of an existing file. Using this technique, you could work on a file which is actually too long to load into your machine's memory in one go.To use a file in this way we first have to open it and when we've finished we have to close it again. There are three commands for opening files:
- OPENIN opens a file for read access only. The file can be read but not altered.
- OPENUP opens a file for read or write access.
- OPENOUT creates a new file, initially zero bytes long. If a file of the same name already exists, it's deleted and a new one created. The file has read or write access but you obviously can't read anything from it until you've written something to it.
If you still have your 'MyText' file, try opening it with this command:
h%=OPENUP("MyText")
The filename is in brackets and can be the actual filename (or complete pathname) in quotes or a string variable containing it.
The variable h% is the file handle. This is a number given to the file by the operating system when it's opened. From now on we refer to the file not by its filename, but by its file handle.
There are several keywords connected with the file which use the file handle. The first of these is EXT# which tells us the length of the file in bytes:
PRINT EXT#h%
The text file shown earlier contains 48 characters, so this command will produce 48.
The keyword PTR# refers to the file pointer which selects which byte in the file we're going to read or write to. We can read a byte with BGET# and write one or more with BPUT#.
Try this:
PTR#h%=10

a%=BGET#h%

PRINT CHR$(a%)
This sets the file pointer to 10 bytes in from the start of the file. In this file, this byte contains the first letter of the word 'text' so the machine will print a 't'. After reading the byte, PTR#h% will automatically be increased by 1, ready to read the next byte, so if you repeat the last two lines, the result will be the next letter, an 'e'.
Writing to the File
As we used OPENUP to open the file, we can change a byte in it, using the BPUT# command which will write either a byte or a string to the file.Let's replace the 't' of 'text' with a capital 'T'. We could put:
PTR#h%=10

BPUT#h%,84
quoting 84, which is the ASCII code for 'T', or we could quote a one-character string, like this:
      PTR#h%=10

      BPUT#h%,"T";
The semi-colon (;) on the end of the line is important. When the BPUT command writes a string to a file, it follows it with a Line Feed (ASCII code 10) to mark the end of the string, unless you tell it not to by including a semi-colon, rather like the PRINT command. If you left out the semi-colon, the next character, 'e', would be over-written by the Line Feed.
You can tell whether or not the pointer has reached the end of the file by the state of the variable EOF#, which stands for End Of File. If the pointer is somewhere within the file, EOF#h% is FALSE. After reading or writing the last byte, the pointer will be set to one byte after the end of the file and EOF#h% becomes TRUE.
We can use this to display the whole file:
PTR#h%=0:REPEAT:a%=BGET#h%:PRINT CHR$a%;:UNTIL EOF#h%:VDU 10
We start by setting the pointer back to the beginning of the file, then read and display each character in turn. The semi-colon after PRINT CHR$a% prevents the PRINT statement from sending a Line Feed to the VDU, otherwise each letter would be on a new line. After the last one has been read, PTR#h% is beyond the end of the file, EOF#h% becomes TRUE and the loop stops repeating. Finally, VDU 10 send a Line Feed to the VDU so that the Basic prompt is on a new line.
Finally, when you've finished with a file, it's important to close it with the CLOSE# command:
CLOSE#h%
This is particularly true if you've written to the file. The file is not changed on the disc every time you write a byte to it - that might well result in too much disc drive activity and worn-out discs. The filing system stores a section of the file in memory and makes the changes there. These changes are only transferred to the disc when it has to move onto a new section of the file, or when the file is closed.
This means that if you alter a file, then reset your machine or switch it off without closing the file first, the file on the disc may not be up-to-date.
Creating a Database Program
We're going to use what we've learned so far in a simple database manager program. It doesn't have many of the features of the sophisticated packages which you can pay a lot of money for, but you can use it for simple storage of information, it will show you how file handling works and it will cost you nothing!Despite the simple nature of the database manager, it's still the longest program in this guide. We've left out a lot of features, otherwise it would have been even longer as well as being more difficult to understand! We won't build it up a bit at a time as we did with the Munchie program because a lot of it needs to be present for it to do anything. Instead, we'll go through its workings a bit at a time, assisted by its structured nature - the fact that it's split up into functions and procedures.
This program has been enhanced slightly since it was published in the first edition of this guide. There are two versions in the files directory, for mode 12 and mode 27, called Database12 and Database27 respectively. Everything in the mode 27 version is displayed 10 text lines lower on the screen.
Before we start, we need to understand a few things about database programs. The usual starting point is to compare a database with a card index file. Each card contains several pieces of information about somebody or something. In the database, the pieces that would be on one card are grouped together and called a record. Each piece of information within a record, for example a name or phone number, is called a field. The whole thing makes up a database file.
To simplify this program, all the fields in a record have to be the same length. This means that they all contain the same number of characters, even if a lot of them are spaces.
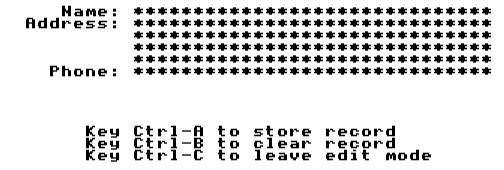
The program has been specially written so that you can 'customise' it to suit your own requirements. The field length and the number of fields in each record are set up in variables just after the start of the program, clearly marked with REM statements. Each field can be displayed on the screen with a label to tell you what it is, such as 'Name :' or 'Address :'. These are set up in a procedure called PROCset_labels which has been deliberately placed right at the end of the program.
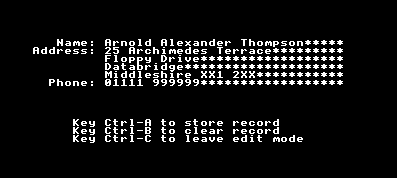
Not all the fields will need labels; in the program as shown here, a record consists of a name, four lines for the address and a phone number. Each line of the address is a separate field; obviously only the first one needs a label.
Using the Program
When you run the program, you're first presented with three options - create a new database file, load an existing file or quit the program completely. Every time you finish with a file you come back to this point.If you choose one of the first two options, the program either creates a new file, zero bytes long, or loads an existing one. If you choose the first option, the program checks first to see if a file with the name you typed already exists. This is very important because without it, if you chose this option by mistake, you would delete your existing file and lose all your data!
After creating or loading your file, the program checks to see if it's zero bytes in length. If it is, you'll be put straight into the editor screen and you won't be allowed out until you've saved a record in the file. This situation happens if you create a new file or if the one you load is zero bytes long.
In the edit screen, the fields are represented by stars to indicate their length. You can move the cursor around the fields by using the arrow keys and type information into them. If you want to start again, pressing Ctrl-B clears all the fields. When you've finished, Ctrl-A saves the record to the file and puts you into the normal display mode or Ctrl-C abandons the edit session.
In the normal display mode, you can browse through the records by pressing 1 to go backwards and 2 to go forwards. Pressing 3 will let you edit the record you are on, 4 lets you create a new record and 5 closes the database file when you've finished with it. This returns you to the opening screen, ready to open another file or quit the program.
Errors With Open Files
Click here to open the entire program file in a separate window. You may wish to keep this window open throughout the description of the program, though some shorter procedures and functions will be listed in the main text. You'll find further links to it where it's referred to.Let's look first at the initial part of the main program, before it gets to its main loop:
      10 REM > Database
      20 REM Simple database manager
      30 ON ERROR REPORT:PRINT" at line ";ERL:END
      40 REM *** Set up database parameters here ***
      50 field_no%=6:REM number of fields
      60 field_len%=30:REM length of fields
      70 REM *** field labels set in PROCset_labels at end of program
      80 REM *** End of parameter setup ***
      90 PROCinit
     100 ON ERROR PROCerror:END
You can see that, in addition to our usual error handler in line 30, there is another in line 100 which calls a procedure, PROCerror:
     510 DEFPROCerror
     520 REM error handling after initialisation
     530 IF file%<>0 CLOSE#file%:REM close database file if open
     540 REPORT:PRINT" at line ";ERL
     550 ENDPROC
If an error occurs, or we press Esc, with a file open, we need to close it before leaving the program. If we don't do this, any changes we've made to the database may not be saved and if we try to do anything with this file, such as opening it again, we will get a 'File open' error message.
We saw earlier in this section how when we open a file we get a number called the file handle which we use to refer to it. In this program, the file handle is the value of variable file%. If we do not have an open file, we set file% to zero. In this way, we can use file% to tell us whether or not a file is open. If our error handler is called, which means that we're going to have to shut down the program, we need to know if we have an open file and close it if we do. PROCerror checks file% for this purpose.
To be safe, we need to create variable file% before there is any chance of PROCerror being called. If we didn't do this and an error occurred before we'd opened a file, line 530 in PROCerror would try to check the value of file% and find it didn't exist. This would result in another call to the error handler, with an 'Unknown or missing variable' error message. When the error handler reached line 530, the same thing would happen again and the program would go round and round in an infinite loop, freezing the machine. We create file%, with its initial value of zero, in PROCinit. Just in case there is an error before this happens, we start off with the error handler in line 30, then replace it with the one in line 100 after we've created file% but before we've opened any files.
Customising the Program
Lines 50 and 60 are concerned with altering the program to suit your own requirements. You can vary the number of fields by changing field_no%, or their length by changing field_len%. These lines are put close to the beginning of the program to make them easier to find and are marked by REM statements containing a number of asterisks.The labels which identify each field are stored in the elements of an array variable called label$(). You can't set up these elements until the array has been DIMmed, which happens in PROCinit, so this job is done by a procedure, PROCset_labels, located at the very end of the program:
     410 DEFPROCinit
     420 REM program initialisation
     430 DIM label$(field_no%),field$(field_no%)
     440 PROCset_labels
     450 MODE 27
     460 quit%=FALSE
     470 file%=0
     480 rec_len%=field_no%*field_len%
     490 ENDPROC
     500 :
    2410 DEFPROCset_labels
    2420 REM *** Define field label names here ***
    2430 label$(1)="Name:"
    2440 label$(2)="Address:"
    2450 label$(6)="Phone:"
    2460 ENDPROC
    2470 :
As well as setting up the label array, PROCinit also DIMs an array called field$(). This array is used as a temporary store for the contents of each field in the record which is being displayed or edited. The procedure also sets up variable quit%, which tells the program when it's time to close down, and rec_len%. This is the total length of each record in the file, which is the field length multiplied by the number of fields.
After setting up these parameters, which only has to be done once, the program enters its main loop. You can see it in the main listing, between lines 110 and 400.
We'll take a look at how the loop as a whole works first, before examining its procedures.
The loop starts with a call to PROCoptions. This procedure prints an instruction telling you which keys to press and waits for you to press 1, 2 or 3 before returning to the main loop. If you press 3, the program simply sets quit% to TRUE, skips the rest of the main loop and exits. If you press 1 or 2, it calls PROCcreate or PROCload as appropriate. PROCcreate creates a new file zero bytes long using OPENOUT. PROCload loads an existing file using OPENUP.
Whichever option you choose, variable record%, which holds the number of the record you're working on, is set to zero and the program enters its secondary loop, inside the main loop.
The first action of the secondary loop is to check the length of the file. If it's zero bytes (which probably means you've just created it with PROCcreate), you've no option but to add the first record to it so the program puts you into edit mode by calling PROCedit.
By the time you come out of PROCedit, you will have added a record to the file as it won't let you leave until the file has something in it. The next time round the secondary loop, the program calls PROCdisplay, which shows you the contents of the record and waits for you to press a suitable key. If you press 1 or 2, the program checks to make sure you're not on the first or last record of the file, increases or decreases record% by 1 and returns to the start of the secondary loop, ready to display a new record, selected by the new value of record%.
If you press 3, the program calls PROCedit to alter the record that you're on. When you press 4, the program creates a new record. It does this by calculating the number of records already in the file by dividing the file length (using EXT#) by the record length, rec_len%, and setting record% to this number. Because records are numbered from zero, this new value of record% represents a new one and PROCedit is called to produce it.
When you press 5, the file is closed. The secondary loop repeats until you've done this, then puts you back to the start of the main loop, giving you the choice of loading or creating a new file or of quitting the program.
Getting Into Finer Detail
We'll look in detail first at PROCedit since you start in edit mode. It's in the main listing between lines 1070 and 1380. You may have noticed that when the secondary loop calls this procedure, it passes it a number, 0 or 1, as a parameter. This is to tell PROCedit whether it's creating a new record or editing an existing one.The first action of the procedure is to call PROClabels:
    1990 DEFPROClabels
    2000 REM Print record number and names of labels
    2010 LOCAL n%
    2020 CLS
    2030 PRINT"Record number ";record%+1
    2040 FOR n%=1 TO field_no%
    2050   PRINT TAB(24-LEN(label$(n%)),n%+19)label$(n%):REM print label, right-ju
   stified
    2060 NEXT
    2070 ENDPROC
    2080 :
This procedure prints the record number in the top left-hand corner of the screen, adding 1 to it so that the records appear to be numbered from 1, not 0. It then prints the name of each label in turn. The rather complicated-looking TAB statement has the effect of right-justifying the label. This means that its horizontal position is adjusted so that the right-hand character is 23 positions in from the left-hand side of the screen, however long the label is. This is purely to improve the appearance of the screen.
When the array which holds the labels, label$(), is created in PROCinit, each element in it is set to the null string, that is zero characters in length. If you don't define a particular label in PROCset_labels, it stays like this and PROClabels doesn't print anything for that line.
The standard layout used by this program has each field appearing on the screen 25 characters in from the left, and the first field, number 1, 20 lines down from the top (10 in mode 12). This means that any particular field is on row 19 (or 9) plus the field number. This is important, because PROCupdate, which we'll get to later, uses the position of the cursor to work out which character in a field to alter.
Seeing Stars
After printing the labels, PROCedit calls PROCstars which prints a rectangle of stars, one for each character of each field. This is to show you the maximum number of characters you can type into each field. This is important because the fields all have to be exactly the correct length so the program knows where to find them in the file. It doesn't matter how short the text in a field is as the rest of the field is filled with spaces.Returning to PROCedit, after printing a message on the bottom of the screen telling you which keys to press, we look at the number which was passed as a parameter when PROCedit was called, which is now local variable x%. If this is zero, indicating that we're editing a newly-created record, we clear all the fields. PROCedit_clear does this by setting each element of the array field$() to a string of spaces, one for each character in the field.
If x% is 1, PROCedit is being used to edit an existing record so we want to display the data in its fields. We don't want to dispense with the stars completely, though, because they show us how many characters we could add to a field, so we print each field over the top of the stars, leaving the ones at the end of each line untouched. This is done by using FNtrunc which removes the excess spaces from the end of each field string.
Suppose, for example, you had a name consisting of 25 characters. Unless you've modified the program, each field has a length of 30 characters, which means that PROCstars has put 30 stars on each line. It also means that field$(1) is 30 characters long. The first 25 contain the name and the last five are spaces. FNtrunc removes these spaces and produces a string 25 characters long containing just the name. When you print this string, the first 25 stars are over-written and the remaining five left untouched.
It may seem unnecessary to use a CASE ... OF structure to handle the various values of x% as there are only two options and we could easily use IF ... THEN instead. Doing it this way makes it easier for you to add other options to use PROCedit in different ways.
Having displayed everything on the screen, the next thing to do is wait for a keypress. Before we do that, though, we need to modify the actions of the arrow keys so that we can use them to move the cursor around the fields.
Normally, these keys give us cursor editing. If we want to change this, we use the command *FX4:
*FX4 or *FX4,0 - cursor editing
*FX4,1 - keys produce ASCII codes:
-
Copy: 135
Left: 136
Right: 137
Down: 138
Up: 139
-
Copy: Key 11
Left: Key 12
Right: Key 13
Down: Key 14
Up: Key 15
In this case, we use *FX4,1 and check for codes 136 to 139. When PROCedit ends, we use *FX4 to put the arrow keys back to normal.
We use a CASE ... OF structure between lines 1250 and 1340 to examine the code produced by the GET keyword. The four numbers produced by the arrow keys call procedures for moving the cursor, using VDU calls. These calls are all listed in Appendix 2. As well as using the arrow keys, the cursor can be moved to the left by pressing Backspace (code 8) and down by pressing Return (code 13).
The ASCII codes 1, 2 and 3 are produced by Ctrl-A, Ctrl-B and Ctrl-C respectively (you can, of course, change these keys, if you wish). Ctrl-A beeps and stores the edited record in the file, Ctrl-B clears all fields of the record, replacing them with stars, so that you can start again and Ctrl-C simply allows you to abandon the edit. You can only do this if there is something in the file. If PROCedit had been called to add a new record onto the end of the file, the file pointer, PTR#file% would be past the end of the file and abandoning the edit in this way would cause problems. This is avoided by reducing record% by 1 so that it contains the number of the last record already in the file.
Updating Fields
If none of these options is chosen, it means we've typed a character for insertion into one of the fields. This is handled by PROCupdate:
    1590 DEFPROCupdate(char%)
    1600 REM update character in field
    1610 IF char%>31 AND char% <127 THEN
    1620   MID$(field$(VPOS-19),POS-24,1)=CHR$(char%)
    1630   VDU char%
    1640   IF POS>field_len%+25 VDU 8
    1650 ENDIF
    1660 ENDPROC
    1670 :
This procedure uses the position of the text cursor to work out which character has to be replaced in which field. It does this by using the keywords POS and VPOS. POS is the horizontal position of the cursor on the line and VPOS the vertical position (these are the numbers you put in a TAB command to move the cursor to that position).
We saw earlier that each field is displayed 25 spaces in from the left and also that field 1 is 20 rows down from the top (10 in mode 12). For this reason, we can work out which character of which field the cursor is on by subtracting 24 from POS to get the character, and 19 (or 9) from VPOS to get the field. The procedure does all this and changes the appropriate character in the field string, using the MID$ keyword.
Each time we update a character, the action of the VDU moves the cursor one space to the right, ready to update the next one. If we type in the last permitted character in a field, the cursor would move to a space beyond the end of the field. If this happens, line 1640 sends a code 8 to the screen which moves it back one space again.
Back in PROCedit, at line 1300, when Ctrl-A is chosen, the file is updated by PROCstore:
    1680 DEFPROCstore
    1690 REM store record in file
    1700 LOCAL n%
    1710 PTR#file%=record%*rec_len%
    1720 FOR n%=1 TO field_no%
    1730   BPUT#file%,field$(n%);
    1740 NEXT
    1750 ENDPROC
    1760 :
The file pointer is first moved to the start of the record by line 1710. This is a position in the file which is worked out by multiplying the record number by the record length. Each field string is then written to the file, using the BPUT# command. Notice that the command is followed by a semi-colon (;) to prevent the string from being followed by a Line Feed character.
When Ctrl-A or Ctrl-C is pressed, PROCedit is terminated, provided there is something in the file (this has to be the case if you pressed Ctrl-A).
Displaying Records
Apart from PROCedit, the most interesting procedure in the program is probably PROCdisplay, which gets all the data for one record from the file and puts it on the screen.
    1870 DEFPROCdisplay
    1880 REM display contents of record and wait for keypress
    1890 LOCAL n%
    1900 PROClabels
    1910 PROCdisplay_bottom
    1920 PTR#file%=record%*rec_len%
    1930 FOR n%=1 TO field_no%
    1940   field$(n%)="":FOR I%=1 TO field_len%:field$(n%)+=CHR$(BGET#file%):NEXT
    1950   PRINT TAB(25,n%+19)field$(n%)
    1960 NEXT
    1970 ENDPROC
    1980 :
Like PROCedit, the first action of this procedure is to display the field labels by calling PROClabels. The instructions at the bottom of the screen telling you which key to press are contained in a separate procedure called PROCdisplay_bottom.
Getting the information from the file consists of setting the file pointer to the start of the record and reading the appropriate number of bytes. Because the records are numbered from zero, each one starts at a position worked out by multiplying the length of one record by the record number. Record 2, for example, has two records before it in the file and starts at 2 times rec_len%.
After setting the pointer, the procedure goes through each element of field$() in turn, setting it to the null string (zero bytes in length), then adding the appropriate number of characters from the file and finally displaying it in the correct place on the screen.
Further Steps
You'll probably agree that what you have is a very simple database program. Nevertheless, it is over 200 lines long and may have taken a bit of assimilating. When you understand how it works, you may like to add to it.How about, for instance, a search facility? You could type in a string and tell the program which field or fields to check. Try using the INSTR keyword, described in Appendix 1.
If you're feeling more adventurous, you could try a sorting procedure. Tell the program which field to sort on and rearrange the records in order.
To make your database program really useful, though, it would be very helpful if you could vary the size and number of fields, and in particular the field labels of individual database files so that your program could be used to store data of all kinds. You could include this information in a 'header' to go at the beginning of the file. You would, of course, have to take the length of the header into account when setting PTR# to the start of a record.